Professional Mold Remediation Services
Don't Let Toxic Mold Put Your Family's Health at Risk
Stop mold damage before it spreads. Call now for a free, no-obligation estimate from a local remediation expert.
No Obligation · Available 24/7 · Local Mold Pros
Wall Cavity Sampling for Mold
Mold behind walls is one of the most common and overlooked problems in homes. You can’t see it, you can’t smell it, but it could be there, damaging drywall and potentially impacting your indoor air quality.
That’s where wall cavity sampling comes in.
As a licensed mold assessor, I use this technique regularly to verify the presence of hidden mold growth without tearing apart a homeowner’s property. In this guide, I’ll walk you through what wall cavity sampling is, how it works, when to use it, and what to expect from the lab results.
What Is Wall Cavity Sampling?
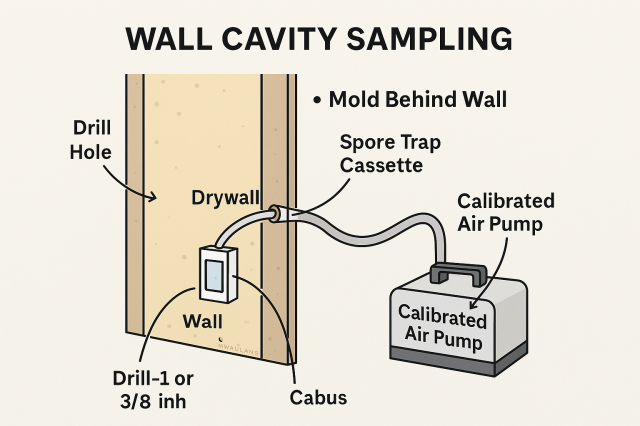
Wall cavity sampling is a method used to test the air or particles inside wall cavities, spaces between drywall, paneling, or other structural materials, without demolishing the wall. A small hole is drilled, and a sampling pump draws air from inside the cavity into a cassette (usually a spore trap), which is then analyzed in a lab.
EPA Guidance:
“Sampling may be useful when there is evidence from visual inspection or occupant complaints, but no visible mold.”
, Environmental Protection Agency (EPA)
When Should You Use Wall Cavity Sampling?
| Scenario | Wall Cavity Sampling Needed? | Why? |
|---|---|---|
| Musty smell but no visible mold | Yes | Mold may be growing behind the wall |
| Water damage history with no current stains | Yes | Helps detect mold growth post-drying |
| Visible mold already present on walls | No | Tape or swab sampling is more direct |
| Buying or selling a home with suspect conditions | Yes | Helps assess hidden damage without demolition |
| Tenant complaints of symptoms but no visible signs | Yes | Useful in legal and insurance cases |
CDC Note:
“Hidden mold behind walls or under floors may be discovered during air or wall cavity sampling, particularly after water damage.”
, Centers for Disease Control and Prevention (CDC)
Tools & Materials Used in Wall Cavity Sampling
| Item | Purpose |
|---|---|
| 3/8" or 1/2" drill bit | Used to create small access hole in drywall |
| Spore trap air cassette | Collects airborne mold spores from cavity space |
| Calibrated air pump | Draws a measured volume of air from wall cavity |
| Tape or plug | Seals hole after sampling is complete |
| PPE (gloves, mask, goggles) | Protects sampler from exposure and cross-contamination |
How the Sampling Process Works
Always wear proper PPE and avoid sampling areas with live electrical wiring behind the wall.
Step-by-Step Breakdown
Select Your Sample Site
Choose areas near water damage, musty odors, or discolored drywall.Drill a Small Hole
Use a 3/8” or 1/2” drill bit. Avoid plumbing and electrical lines.Insert Tubing and Begin Sampling
Attach tubing to the spore trap cassette and insert through the hole. Start pump at ~15 L/min for 5–10 minutes depending on cassette and lab specs.Seal the Hole
After sampling, seal with tape or drywall plug if no further inspection is needed.Label and Submit to Lab
Include room location, wall surface (e.g., interior, bathroom), and any notable observations.
What the Lab Report Tells You
The lab will analyze the spores captured on the cassette and report:
- Mold genera (e.g., Aspergillus, Stachybotrys)
- Spore counts per cubic meter
- Comparison to outdoor baseline (optional but recommended)
Sample Lab Report Snapshot
| Mold Genus | Count (per m³) | Notes |
|---|---|---|
| Penicillium/Aspergillus | 4,200 | Elevated compared to ambient air |
| Stachybotrys | 180 | Water damage indicator |
| Cladosporium | 320 | Common outdoor mold, low concern |
If indoor cavity results show significantly higher counts than outdoor air, it may indicate active mold growth behind the wall.
🆚 Wall Cavity Sampling vs. Other Methods
| Method | Best Use Case | Pros | Cons |
|---|---|---|---|
| Wall Cavity Sampling | Suspected mold behind walls | Minimal damage, targeted | Requires drilling and tools |
| Air Sampling | General indoor air quality concern | Covers large areas | Doesn’t pinpoint location |
| Tape/Swab Sampling | Visible mold on surfaces | Simple and quick | Doesn’t assess hidden areas |
| Bulk Sampling | Damaged drywall or material removal | High accuracy on materials | Destructive, not always needed |
Common Mistakes to Avoid
| Mistake | Why It Matters |
|---|---|
| Drilling too close to outlets | Risk of hitting live wires |
| Not labeling cassettes | Lab won’t know what they’re analyzing |
| Skipping PPE | Puts you at health risk |
| Using cheap or uncalibrated pumps | Results won’t be valid or reproducible |
Frequently Asked Questions (FAQs)
Will wall cavity sampling damage my wall?
A small hole is drilled, but it’s easily patched and far less destructive than removing whole sections of drywall.
Can I do wall cavity sampling myself?
It’s best done by a licensed mold assessor or indoor environmental professional to ensure safety, accuracy, and legal documentation.
How long does it take to get results?
Most labs return results within 2 to 5 business days depending on service speed.
Is this covered by insurance?
If there’s documented water damage or health complaints, your insurer may cover the cost. Always check your policy.
Will this find all hidden mold?
It detects airborne spores in the cavity, but if mold is sealed in tight insulation or blocked by vapor barriers, results may be underestimated.
Final Thoughts from Brad Fishbein
If you’re dealing with a musty smell, past water damage, or unexplained health symptoms, but can’t see any mold,wall cavity sampling may be the smartest, least-invasive step you can take.
It’s a tool I trust and use when the stakes are high and the mold is out of sight.
Explore Related Topics:
- Mold Testing Methods
- How To Test For Mold In A Home - Air Sampling or Dust Sampling?
- Air Quality Testing for Mold: What You Should Know
- ERMI Mold Test: A Comprehensive Guide to Dust Sampling For Mold
- Mold Inspection Expert Reveals All You Need To Know Prior To Hire
Mold Removal Guides

Notice an update we should make?
We strive for accuracy. Contact us here if you see incorrect or outdated info on this page.